
1. 계기
코드스쿼드 마지막 팀 프로젝트인 Issue Tracker를 진행하다가, CollectionView(Issue Cell)안에 CollectionView(Label Cell)이 있으면 편하게 구현할 수 있겠다고 생각했습니다.
하지만 편할 것이라는 생각과는 다르게, 처음 해보다보니 이 두 CollectionVIew의 DataSource를 관리하는데서 부터 애를 먹기 시작했습니다.
이전에 Side Dish같은 프로젝트를 진행할 때에도 왜 CollectionView가 아닌 ScrollView를 사용하려고 하냐는 코드 리뷰를 받았는데, 할 줄 모른다는 핑계를 대신해서 프로젝트 요구사항 을 들먹였던 기억이 떠올라, 이번에는 확실히 짚고 넘어가자고 생각해 정리하려고 합니다.
2. 모델링
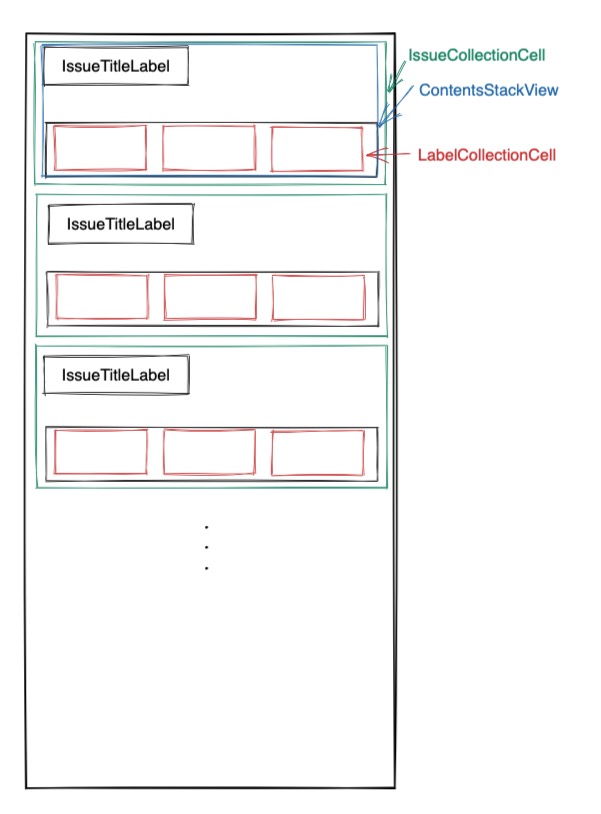
구현해 볼 내용을 간단하게 모델링한 내용은 위와 같습니다. Issue에 해당하는 IssueCollectionView의 Cell 내에 해당 Issue에 속해 있는 Label들을 보여줄 LabelCollectionView가 있는 형태입니다.
여기서 사용할 타입은 아래와 같이 정의했습니다.
1
2
3
4
5
6
7
8
9
struct Issue {
	let title: String
    let labels: [Label]
}

struct Label {
    let title: String
    let backgroundColor: UIColor
}
IssueCollectionCell에서 사용할 타입은 Issue이고, 이 셀에는 CollectionView가 존재하므로, 해당 CollectionView에서 사용할 데이터([Label])까지 한 번에 받는 것이 핵심입니다.
3. 구현
1. LabelCollectionCell
1
2
3
4
5
6
7
8
9
10
11
12
13
14
15
16
17
18
19
20
21
22
23
24
25
26
27
28
29
30
31
32
33
34
35
36
37
//  LabelCollectionCell.swift

import SnapKit
import UIKit

final class LabelCollectionCell: UICollectionViewCell {
    static let identifier = String(describing: LabelCollectionCell.self)

    private let labelLabel: PaddingLabel = {
        let label = PaddingLabel()
        label.setEdgeInset(top: 4, bottom: 4, left: 16, right: 16)
        label.translatesAutoresizingMaskIntoConstraints = false
        return label
    }()

    override init(frame: CGRect) {
        super.init(frame: frame)
        addSubview(labelLabel)
    }

    @available(*, unavailable)
    required init?(coder: NSCoder) {
        fatalError("init(coder:) has not been implemented")
    }

    func configure(with label: Label) {
        labelLabel.text = label.title
        labelLabel.backgroundColor = label.backgroundColor
    }

    override func layoutSubviews() {
        super.layoutSubviews()
        labelLabel.snp.makeConstraints { make in
            make.edges.equalTo(self)
        }
    }
}
2. IssueCollectionCell
이 Cell에서 LabelCollectionView를 갖고 있게 하기 위해, LabelCollectionViewController를 갖고 있습니다.
LabelCollectionView만 가지고 있을 경우, LabelCollectionView에 대한 DataSource, Delegate 모두 해당 Cell에서 담당하게 되는 어색한 상황이 발생했기 때문입니다.
1
2
3
4
5
6
7
8
9
10
11
12
13
14
15
16
17
18
19
20
21
22
23
24
25
26
27
28
29
30
31
32
33
34
35
36
37
38
39
40
41
42
43
44
45
46
47
48
49
50
51
52
53
54
55
56
57
//  IssueCollectionCell.swift

import UIKit
import SnapKit

final class IssueCollectionCell: UICollectionViewCell {
    static let identifier = String(describing: IssueCollectionCell.self)

    let contentsStackView: UIStackView = {
        let stackView = UIStackView()
        stackView.translatesAutoresizingMaskIntoConstraints = false
        stackView.axis = .vertical
        stackView.spacing = 15
        return stackView
    }()

    private let titleLabel: UILabel = {
        let label = UILabel()
        label.numberOfLines = 0
        label.font = .systemFont(ofSize: 22)
        label.translatesAutoresizingMaskIntoConstraints = false
        label.adjustsFontSizeToFitWidth = true
        return label
    }()

    private let labelCollectionViewController = LabelCollectionViewController()

    private var data = [Label]()

    override init(frame: CGRect) {
        super.init(frame: frame)
        addSubview(contentsStackView)
        contentsStackView.addArrangedSubview(titleLabel)
        contentStackView.addArracgedSubview(labelCollectionViewController.view)
        clipsToBounds = true
    }

    @available(*, unavailable)
    required init?(coder: NSCoder) {
        fatalError("init(coder:) has not been implemented")
    }

    func configure(with issue: Issue) {
        titleLabel.text = issue.title
        data = issue.labels
        contentsStackView.addArrangedSubview(labelCollectionViewController.view)
        configureLabels(with: issue)
    }

    override func layoutSubviews() {
        contentsStackView.snp.makeConstraints { make in
            make.top.bottom.equalTo(self)
            make.width.equalTo(UIScreen.main.bounds.width * 0.8)
            make.centerX.equalTo(self)
        }
    }
}
4. 문제 해결
1. LabelCollectionCell의 간격 문제
LabelCollectionView를 초기화할 때 UICollectionViewFlowLayout을 설정해주면서 UICollectionViewFlowLayout.minimumLineSpacing = 10과 같이 설정을 해주었기 때문에 Cell간 간격이 지정될 것이라고 생각했지만, 제가 원하는 간격이 지정되지 않는 문제가 발생했습니다..🚨
| minimumLineSpacing = 10 | minimumLineSpacing = 100 |
|---|---|
 | 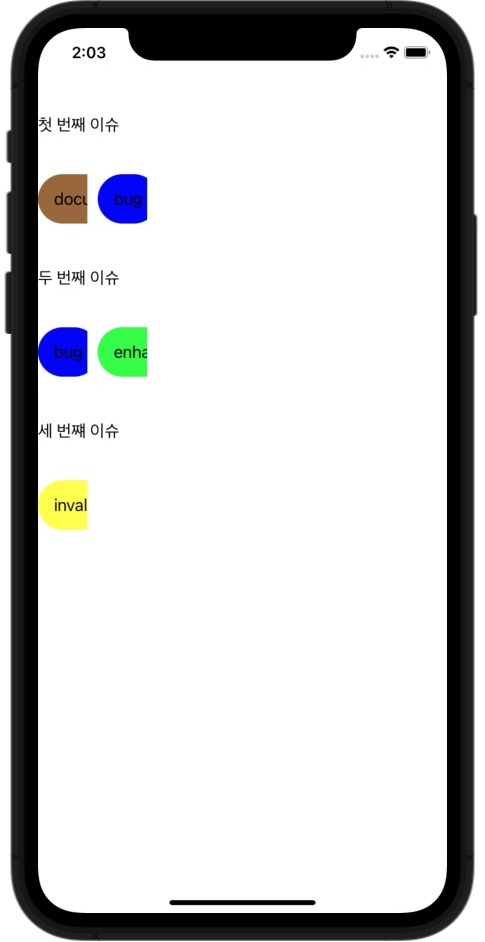 |
minimumLineSpacing 속성을 바꾸어주어도, Cell간 간격에는 달라지는 점이 없었습니다,,
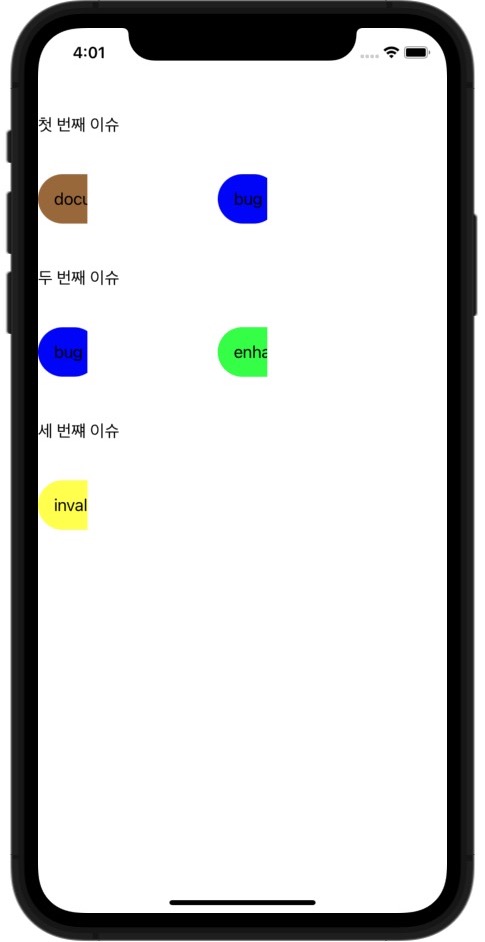
여기서 찾은 첫번째 문제는, horizontal 방향으로 스크롤되는 CollectionView의 경우, 셀 간격을 조정하기 위해서는 minimumLineSpacing이 아니라, minimumInteritemSpacing 을 설정해주어야 한다는 것입니다.
1
2
3
4
5
6
7
// final class LabelCollectionView: UICollectionView
convenience init() {
    let flowLayout = UICollectionViewFlowLayout()
    flowLayout.minimumInteritemSpacing = 100
    self.init(frame: .zero, collectionViewLayout: flowLayout)
    ...
}
작성했던 LabelCollectionView의 설정 값들 중, 위에서 말한 값을 수정해주었더니 아래와 같이 화면이 변경되었습니다!
2. LabelCollectionCell의 dynamic width
이제, LabelCollectionCell의 width를 글자의 길이에 맞게 dynamic하게 설정하는 과정이 필요합니다.
Cell의 Layout을 설정하는 객체는 UICollectionViewDelegate, 여기서 UICollectionViewFlowLayout을 이용하면 된다고 판단했습니다.
해당 객체의 collectionView(_: layout: sizeForItemAt:) -> CGSize 메소드를 이용해 Cell의 크기를 지정해줄 수 있습니다.
그럼 아직 들어오지 않은 String 값의 width를 어떻게 알 수 있을까요?
String.size(withAttribute:) 메소드를 이용해 알 수 있었습니다.
String이 들어갈 UI(저는 UILabel의 길이를 구하려고 합니다.)에서 사용하는 Font 속성을 사용해 width를 아래와 같이 구할 수 있습니다.
1
String.size(withAttribute: [NSAttributedString.Key.font: .systemFont(ofSize: 17)])
위 코드를 이용해 UICollectionViewDelegateFlowLayout 객체를 완성했습니다.
1
2
3
4
5
extension IssueCollectionCell: UICollectionViewDelegateFlowLayout {
func collectionView(_ collectionView: UICollectionView, layout collectionViewLayout: UICollectionViewLayout, sizeForItemAt indexPath: IndexPath) -> CGSize {
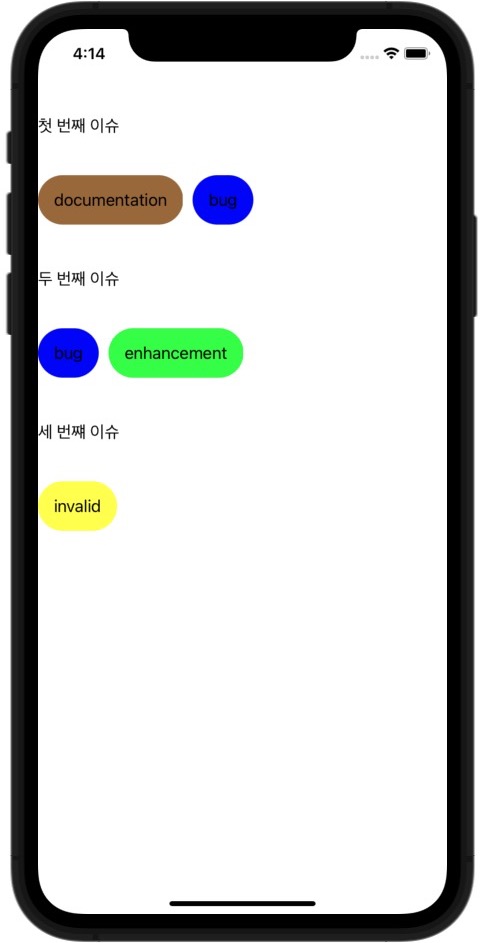
return CGSize(width: data[indexPath.item].title.size(withAttributes: [NSAttributedString.Key.font: UIFont.systemFont(ofSize: 17)]).width + 32, height: 50)
}
}
이제 원하는 화면이 나오는 것을 확인할 수 있었습니다!
(길이가 너무 길어져, 2편에서 마저 작성하겠습니다! 2편에는 CollectionView Dynamic Height를 중점으로 작성합니다.)